Printed and stitched designs on small custom runs
The machines behind a “custom print” option, what each does well, why embroidery needs larger letters than you expect, and how to say where a design goes so it lands there.
Print methods sellers offer for small runs
A listing that says “custom print” could mean any of several machines, and each leaves a different result on the fabric. Five methods cover nearly everything sellers offer for small orders: screen printing, direct-to-garment printing, printed transfer film, cut vinyl and sublimation. The listing rarely names the method in English, so it is worth asking.
The grid compares them on the questions that usually decide a small custom job: does it suit a single piece, does it cope with many colors or a photo, does it work on a dark garment, and does it work on polyester. The marks are general tendencies drawn from equipment makers’ and print shops’ public guides; a particular seller’s setup can do better or worse.
If you only remember one line: photos and many colors on cotton point to direct-to-garment or transfer film, a few flat colors on many pieces point to screen printing, names and numbers point to vinyl, and pale polyester sportswear points to sublimation.
Screen printing: one screen for every color
Screen printing pushes ink through a fine mesh stencil, one color at a time, and each color needs its own screen. Making the screens is the slow, costly part; printing is fast once they exist. That is why screen printing tends to pay off on runs of dozens rather than a single piece, and why sellers who offer it often set a minimum quantity.
The results are durable and opaque, which is why it handles dark garments well: a solid white ink sits on top of black cotton without looking gray. Its limits are gradients and photos, which have to be broken into dots, and designs with many colors, which multiply the screens.
For a brief, screen printing means stating the exact number of colors and sending each as a flat area. If you want a spot of gold or a neon, say so early: special inks are a screen-printing strength and a weakness of most digital methods.
Direct-to-garment: an inkjet for cotton
Direct-to-garment printers work like a desktop inkjet scaled up to hold a shirt. The design goes from file to fabric with almost no setup, so one piece costs about the same to make as the tenth, and a photo or a painting with hundreds of colors is no harder than a single line of text.
The method is happiest on cotton. Inks soak into natural fibers and stay soft to the touch. On dark cotton the printer usually lays down a white base first, after treating the fabric so the white sticks, and on polyester-heavy garments results are often weaker. If your base item is a performance tee, ask before assuming.
In a brief, direct-to-garment means sending the best file you have, because the printer reproduces it faithfully, flaws included. A soft edge, a stray gray pixel or a JPG halo all appear on the shirt.
Printed transfer film and cut vinyl
Two heat-pressed methods cover a lot of small custom work. Printed transfer film is printed in full color onto a film, coated with an adhesive and pressed onto the garment. It works on cotton and polyester, light or dark, which makes it a common choice when the base item is awkward for other methods.
Cut vinyl is older and simpler. A plotter cuts letters or shapes from a roll of colored vinyl, someone peels away the spare material, and the rest is pressed on with heat. It shines for names, numbers and short slogans in one or two colors. Each color is a separate layer, so detailed or many-colored designs are a poor fit.
Both sit on top of the fabric, so you feel the design as a smooth layer, and both are sensitive to how they are washed. If the piece is a gift, a care note about turning it inside out and avoiding a hot dryer is worth passing on.
Sublimation and why it needs pale polyester
Sublimation is the odd one out. The design is printed onto paper with special dyes, then heat turns the dye into a gas that bonds with polyester fibers. The print becomes part of the fabric rather than a layer on top, so it cannot crack or peel and you cannot feel it.
The trade-off is strict. It works on polyester or fabric with a high polyester share, and only on white or very pale garments, because the dyes are see-through and there is no white ink. On a cotton tee the dye simply washes out; on a dark shirt it disappears.
That makes sublimation ideal for all-over patterns on pale sportswear, socks and bags made of polyester, and useless for most other custom work. If a listing offering “full color custom” turns out to be sublimation, check the fabric before you design for a black hoodie.
Embroidered names, patches and stitch counts
Embroidery does not print your file; it rebuilds it in thread. Before a machine can stitch, someone converts the artwork into a stitch file, deciding the direction, density and order of every stitch. That step is often called digitizing, and it is why sellers sometimes charge a one-time setup for a new design.
Price and time usually follow the number of stitches, which grows with the area covered and the density. A small left-chest name might be a few thousand stitches; a full jacket back can be many times more.
Small lettering is the usual trouble. Guides from embroidery equipment makers commonly put the practical minimum height for readable letters at around a quarter inch, about 6 millimeters, with bold block letters holding up better than thin script, and caps or stretchy knits needing more. Below that, the inside of an “e” or an “a” fills in.
Thread colors matter too: each change adds a stop on the machine. Two or three colors usually look cleaner than eight.
Patches when the detail is too fine for thread
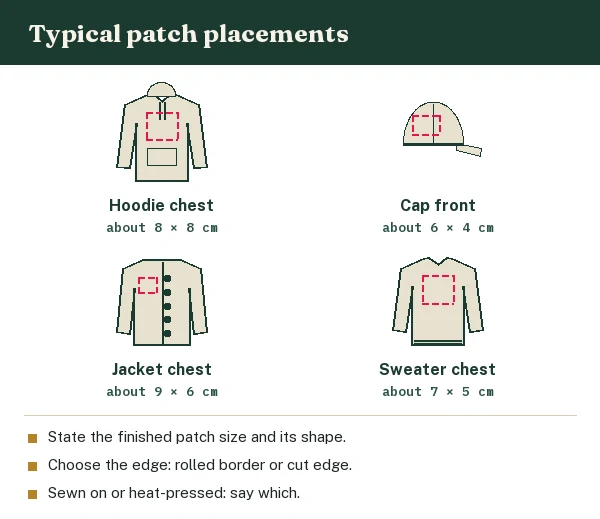
Some designs will never read well stitched straight onto a hoodie: tiny text, thin lines, a crest with fine shading. A patch can rescue them. The design is embroidered or woven onto a separate piece of fabric, trimmed, and then sewn or heat-pressed onto the garment.
Woven patches use finer thread than embroidery and hold much smaller detail, which makes them the usual answer for little lettering. Embroidered patches have the raised texture people expect. Either way, the patch can be made flat on a machine and attached to a curved cap or a padded jacket that would be hard to stitch directly.
In the brief, give the patch’s finished size and shape, the edge you want (a rolled border or a cut edge), and how it should be attached. Say where on the garment it goes, measured from a seam, as described in the next section.
Where a print or a stitch can go
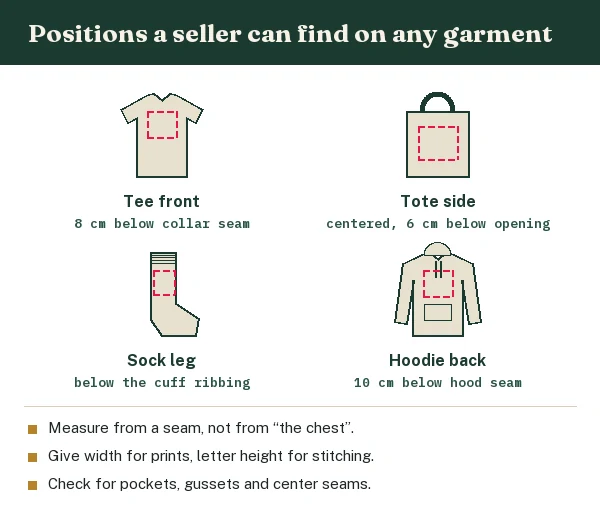
“Center chest” means different things to different people. On a tee one seller places a chest print 7 centimeters below the collar seam, another 10. The fix is to give the position as a measurement from something the seller can find on any garment: the collar seam, the center front, a shoulder seam, the brim seam of a cap.
A good position line reads like this: “centered left to right, top edge 8 cm below the collar seam, design 22 cm wide”. Give the width rather than the height for prints and the letter height for embroidery, since those are what the seller sets first.
Check the base item for obstacles. A hoodie’s front pocket cuts across the lower chest, a tote has side seams and a gusset, a cap’s front panel curves and often has a center seam. Designs that cross a seam or a pocket edge come out broken or skewed, and nobody can fix that after the fact.